Allow and approve session requests
Let users request or create their own sessions, and approve or reject the requests they send.
You can let users schedule their own sessions. For each user, you choose whether their sessions need your approval first.
Set a user’s permission
- Select Users in the sidebar.
- Find the user. You can search by name or email, or filter by role.
- Select the three dots at the far right of their row, then Edit permissions.
- Under Session creation, choose one option:
- No session creation: the user cannot create sessions or send requests.
- Request approval: the user can send session requests. An administrator must approve each request before it goes to SignGlasses.
- Create sessions: the user can create sessions without approval. They can also cancel upcoming sessions they created.
- Select Save.
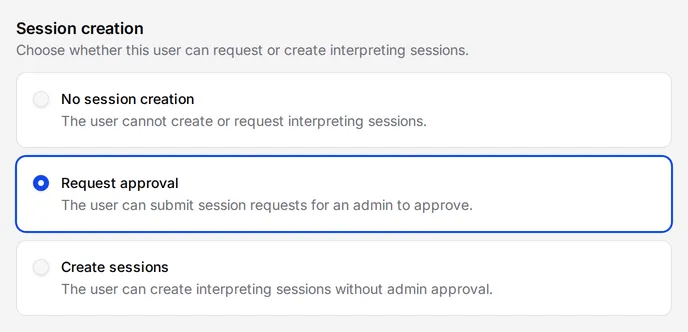
The session creation choice appears only for people with the user role.
Review a request
When a user with Request approval sends a request, you receive an email with a Review request link. The request also appears under Event requests on your dashboard.
- Select the request under Event requests, or select Review request in the email.
- Review the details. To change something first, such as adding a meeting link, select the pencil icon next to Session Information. The form that opens has its own Approve and Reject buttons.
- Select Approve to send the session to SignGlasses, or Reject to deny the request.
For a repeating request, your decision applies to every session in the series. The user receives an email saying whether you approved or denied the request.
An approved session appears on your calendar, and SignGlasses starts looking for a practitioner if one is needed. SignGlasses does not look for a practitioner until you select Approve.